 The Notepad++ editor is the Swiss Army knife of text editing. With hundreds of plugins, the tool can be configured as an editor to almost any development workflow. In the previous post, we reviewed how to add comments to a JSON configuration file. We will now create a custom editor that supports those comments and the custom configuration keywords.
Although the editors provided by Dreamweaver and Eclipse can be used to edit JSON files, there are times when a fully customized editor can help simplify the development process. For instance, when creating a configuration-based platform for software development, a custom editor can help reduce errors and make it easier to read and modify the configuration files.
Notepad++ makes it easy to create custom code and syntax highlighting for custom grammars and languages. After installation of the Notepad++ program, simply open the “Language” menu and select “Define your language…” from the drop-down. On certain versions of Notepad++, this could be under the “View” menu instead, under the menu item “User Defined Languages”.
To create a new language, click the “Create New…” button, and enter the language name. As a first configuration step, we will enable the comments we created in the previous post. Select the “Comment & Number” tab, and enter “//” under the Open textbox, and select a green color as the “Foreground color” under the Styler dialog.
Next, add custom keywords to the “Keywords” lists. These will be customized to the grammar of the configuration file. Since these are JSON configuration files, enter double-quotes around each keyword and be sure to select the “Prefix mode” checkbox.
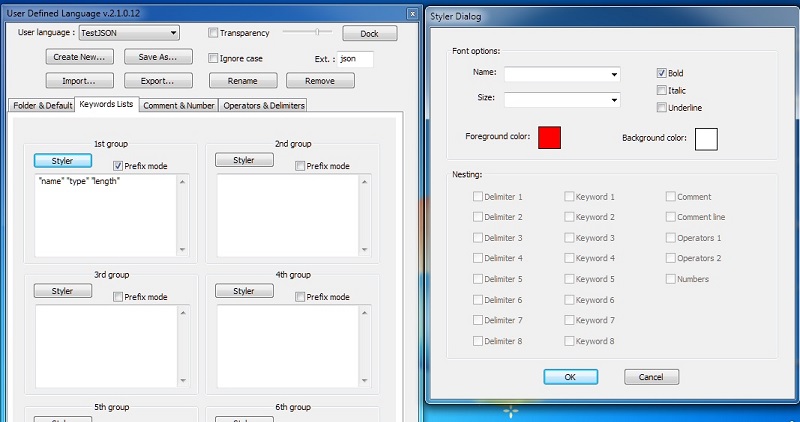
All the keywords that share a single code highlighting color can be entered in one “group” textbox, separated by a single space. When the list of keywords is complete, open the Styler dialog to select the color for the syntax highlighting. An example of the keywords could be as follows:
"name" "type" "length"
Next, associate the file type extension for the language. In the top-right of the dialog, there is a textbox captioned “Ext”. Enter the extension for the configuration files (excluding the period), and future files opened with this extension should automatically load the UDL (User Defined Language).
The UDL configuration is easiest to do when working on an existing file. By selecting the “Transparency” checkbox, the dialog can be made semi-transparent so that the updates can be previewed in real-time while working on the configuration.
As a final step, export the language to an XML file for backup or sharing with others. Click the “Export” button in the dialog and save the UDL to an XML file on disk.
Written by Andrew Palczewski
About the Author
Andrew Palczewski is CEO of apHarmony, a Chicago software development company. He holds a Master's degree in Computer Engineering from the University of Illinois at Urbana-Champaign and has over ten years' experience in managing development of software projects.
Google+


I exported my language. How to make him usable?
samuel riboulet,
To use your exported language (should be in .XML format) you must export it, then move the “ext”.xml file you created to ProgramFiles/NotePad++/autocompletion/
It should appear in the languages section in notepad++
If you mean, how do you execute and use your language, then you will have to create a program to interpret what your code means and execute it properly. Normally, programs don’t know what to do with your code, sometimes even if it is exactly like their extension, so creating a program would be best. Of course, sometimes there are exceptions and a program will run it almost perfectly, but the best thing would be is to make a program to execute it. If you have any other issues, or questions, make sure to reply!